Wednesday, October 31, 2012

FOLK WISDOM WISHES YOU A HAPPY HALLOWEEN!


Hello Friends!  Here's hoping the weather outside ISN'T FRIGHTFUL and that you have the spirit of Halloween with you!

With the heart of this holiday season, we celebrate Halloween in FOLK WISDOM style: with some vintage cards and photos from another era! Enjoy!


POSTCARDS were all the rage during the Victorian and Edwardian eras, and Halloween became a huge beacon for postcard art. Below are a few examples of interesting Halloween postcards!


Curiously, these post cards seem to harken back to the Victorian habit of using remnant fortune telling of
an even older time. Here, a young woman practices the Victorian habit of using a candle in a mirror to see the face of her future husband/love (as noted by the "cupid" sitting atop the pumpkin)!


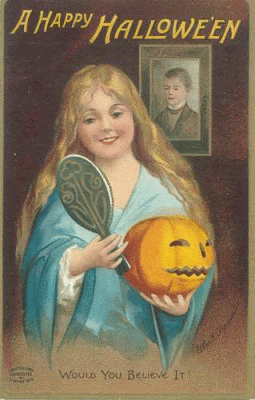
Another Victorian beauty looks in the mirror to see a love (supposedly denoted by the picture of the gent in the background).


A more blatant version of this "fortune telling" comes in a post card that asks the questions of who one would marry, all around the card...sort of like a ouija board or game of chance, perhaps?


                                       A general post card of the Victorian era

                                                    Some cards carried cheery poems...


In the meantime, various vintage pictures of Halloween capture our imaginations. The interesting costumes and customs of another time are vividly illustrated, below:


                                                    Victorian Children, masquerading....


                                                               Little Devils, Circa 1920's


Improvised costumes and themes, such as these "witchy" women, marked the turn of the century and Victorian Era. These costumes were made of black crepe (at the collars and "aprons"). Circa 1910


                                                  At a Victorian Halloween Party


                          And, as we reported yesterday: these are "Thanksgiving Maskers"


                                               A Mob of Mischievous Maskers...


                                        We hope you enjoyed this walk down memory lane......


 HAVE A HAPPY AND SAFE HALLOWEEN!

Tuesday, October 30, 2012

Halloween: Strange History, Customs, and Lore


As we continue our homage to Halloween, we present some interesting and perhaps little known insights into the holiday.

Crossroads: It was said (depending on whom you talked to) that crossroads were either lucky or unlucky places to find oneself during Halloween. In many belief systems, since the veil between the living and dead was thinnest, it was at a crossroads where the dead would pass through realms....so it was best to avoid such areas to avoid "trouble." Conversely, crossroads were areas of "energy collision" and a place of magic and luck. 

Persons could live a farthing/penny at the sight of crossroads to ensure luck and to bribe safe passage from evil spirits.

Jack O Lanterns: Did you know that Jack O' Lanterns owe their existence to turnips? The olde Irish often used lanterns to light the way on early Fall evenings...but some, too poor to afford those made of metals, would carve crude ones from turnips, place some kindling inside, and light it. Eventually, in order to drive spirits away during all Hallows--according to some accounts--the larger gourds and pumpkins grown in the fields were carved with frightening "faces" to scare away spirits, and places on porches and in front of fences as sentinels to keep evil away.

Ghosts: Have been called many things throughout the ages. Bygone names included: phantom, spectre, shade, haint, bogart, spook.

Deviled Eggs: This curious bit of trivia appears to have some connection with Victorian Halloween. During this era, the gruesome ideas of Halloween were downplayed and became a social event. Halloween postcards, party invites, and more, were the thrill of the era, with the Dennison paper company creating crepe costumes, invites, and even recipe pamphlets for such revelry.

       One of many Dennison publications giving suggestions for throwing Halloween parties...


One "hot" item for the practical hostess who was putting on a Halloween party--Deviled Eggs. As the story goes, the "devil"ling came from the use of the spice paprika...which was red, and also hot...two attributes, supposedly of the devil (or Hell).

Conversely, there are a rare few mention of the recipe calling itself "Angel-ed Eggs" which involve the use of mayonnaise in the eggs, which are white and perhaps more soothing, as was characteristic of "angels," which at least makes for interesting food lore!

Trick Or Treating: Trick or Treating has a long and complex history, which seems to stem from various cultural customs and phenomena....the origin seems to stem betwixt the pagan holiday of Halloween (known in old Gaelic as Samhain) and the Church's version of All Souls Day, which was superimposed over the original holiday.

At this time, the Christian custom was to go to see a departed loved one at the cemetery, pray for them at Church, and give alms to the poor in the name of the departed.

Sensing this, beggars often went door to door to receive money or "Soul Cakes" which were given. This eventually came to involve poor groups singing or dancing, from door to door, sometimes in shabby costumes, for a bit of charity. This eventually became known as "mumming" or the "Mummer's Dance" (as in the well known song by recording artist Loreena McKennit).

The tradition stuck, although eventually outlawed by authorities, children were allowed to continue in costume, this time known as Masking, and this became quite elaborate during the Victorian era. Since Halloween and Thanksgiving fell in relative quick succession one-after-another, the idea of Thanksgiving Masking became a large idea, with children reenacting those original mummers by dressing shabbily (usually as hobos) and begging pennies and sweets:

click to enlarge


When Thanksgiving became an official holiday , the practice of begging was replaced by family feasts and get-togethers, and the mummers begging eventuall morphed into the Trick Or Treat tradition, instead, during the end of October.

Bonfires: Speaking of maskers....modern day bonfires are indirectly tied to Victorian mischief-makers, as well as ancient practices. The ancients of Europe, afraid that the coming of Winter would signal a permanent loss of the Sun (because of the much longer days of darkness during Fall and Winter), would light bonfires to hail the sun back, to light the night in their communities, and as religious ceremony.  The practice remained during the Halloween season to such and extent that Halloween revelers would wreak havoc by burning bonfires of trashed goods, even during the Victorian era.  Whether this was inspiration for Devil's Night revelers of today, we'll never know!

And those are just some of the strange Halloween customs throughout the ages!

TOMORROW: MORE VINTAGE and ANTIQUE images to celebrate HALLOWEEN!


Monday, October 29, 2012

Folk Wise: A Short History Of Halloween


Sit back, My Friends, pour yourself a libation, and gather round the campfire, for this is an olden story of the real history of Halloween....a tale as mesmerizing as anything in history...
.


The history of Halloween is really the story of older cultures, particularly  Europe,  Ireland and Britain...where the ancients heeded, and feared concepts of the dark, and the dead.  As Winter drew near, and the sun-set earlier and earlier, the fear was that the sun would not return, and so ceremonies were created to beckon back the light, bonfires were lit to mimic the light and heat of that sacred orb, and rituals held during that time.

Amongst some pagan peoples, this age was known as their New Year, when magic was at it's highest point. Communing with nature, the ever feared witch still has a recognized place in modern Halloween imagery, and this includes witches, cauldrons brooms, and black cats, which were often considered witches in disguise (because, clearly, according to old superstition, witches could change themselves into animals). Hexes to bring luck or "unluck" are believed in, even to this day.

Amongst the Celts (ancient Irish) and other Europeans, this time was honored (or feared!) as the time when the thread between the living and dead was thinnest, and that the dead could rise, and wander the countryside, and commune with those of us that were alive. There are two specific rituals created in response to this...

One is the Dumb Supper, in which a family would create a special meal in honor of a lost loved one, and even set a place at the table (sometimes the head of the table) for their dearly departed, including serving food to the invisible guest, or then leaving a plate of goodies (and sometimes even coins and wine) outside the door of the house, for wandering spirits. 

The reason it is called a DUMB Supper is that those attending such a dinner would then eat the entirety in silence, perhaps internally remembering their own special memories with the departed. DUMB in early eras was used to signal that someone could not talk (such as in the phrase "Deaf and Dumb" which was a slang characterization of either a deaf person, or someone with a mental deficiency, where the word dumb eventually became another term for "stupid")

In any case, the silence was a means of paying respect to their departed and keeping oneself silent also allowed one to reflect on their lost loved ones in thought and meditation.

In Mexico, in particular, this tradition has become quite huge (and even outlandish, in some ways), in a celebration known as Dia De Los Muertos, held on November 2nd.  It's a huge celebration of one's dead beloveds, but with an almost flippant tone--where calavaras (skeletons) rule, and sugar skulls, skull costumes, and pan de muertos ('bread of the dead,' a sort of soul cake/bread) is served.


Meanwhile, back in Europe, the other process resulting in the mingling of the dead was costuming oneself on this sacred day. The costumes were ghoulish, in order to blend in with the ghosts and dead spirits (if you looked like them, they wouldn't bother you or recognize you), or to hide from their wrath.

From there, the holiday took on a life of it's own.  By the Victorian era, it had morphed into a social event, with formal invites and parties, and dressing up...now done mostly by children. Food and sweets were the name of the game...however....fortune telling was rife throughout--with "spells for foretelling your future spouse" a big hit amongst these, perhaps a  nod to faraway witchery. Oddly, printed paraphanalia of such things (such as the Victorian card, below), strongly hint at this paganish past, romantically colored over in Victorian style:


Children would meanwhile go "masking" from door to door for sweets or coins. Games of chance and skill, such as bobbing for apples, were played. Lanterns, costumes, and hangings made of crepe and colored paper were the rage....


                                                    Victorian children in costume.....

And those, my lovelies, were the beginnings of our modern Halloween! Enjoy it, wherever you are!

TOMORROW! LITTLE KNOWN FACTS and HISTORICAL photos of HALLOWEEN!

Friday, October 26, 2012

FOLK ART FRIDAYS: Nancy Lee Malay


Nancy Malay creates a variety of vintage-inspired items in her cozy home studio in Faribault, MN. An artist specializing in nostalgic and whimsical figurines, she meticulously handcrafts each item, using paper mache, paper clay and cloth. Embellishments of mica, antique trimmings, German glass glitter and tinsel give each figure its own personality and embues each with an authentic, old-world style. Besides selling her art independently,  she is also a licensed designer for Midwest-CBK.
 
She and her husband, Rick have been married for 33 years and have 3 sons (and now, 3 beautiful daughter-in-laws!) They also just became Grandparents for the first time in June!

You can find Nancy's work..such as the ones above, and below, and more about Nancy at the following:


How long have you been creating folk art? What inspired you to start creating folk art?

Growing up in a small, rural town with my seven siblings, creating was just a way of life for me as a child! Whether we were mixing paper mache in the bathtub or cutting out Valentines, we made decorations for every Holiday and sewed most of our own clothing.

As my work evolved over the years, I think I’ve really developed my own style of Folk Art. I love the vintage or time-worn look, with lots of sparkle and texture. It’s fun for me
to go through my stash of antique trims, buttons and accessories and put together objects so that I can use a certain theme, or I’ll focus on specific colors, like pink or red. I work on every Holiday year around, so witches and snowmen co-exist on my workbench along with rabbits and Santas.


What sort of themes and subjects do you like or specialize in?

  One of my favorite things to create are Santas, even though they are the most time consuming.  I love that they have so much detail and giving each one their facial expressions make them come to life. I find that adding the mohair beard and hair, (strand by strand) is really challenging, but relaxing to do.


Do you have a favorite piece?

 I like to keep things interesting and fresh, so each Season I try to branch out and try something new that I’ve never done before. It might be using a new product that I’ve heard about, or I’ll experiment with different objects and make things like the little paper trees I’m working on right now.  It’s hard to part with some items, so they’ll hang around my studio a bit longer than others! I recently made a snowman with a little girl on his shoulders, which represents my husband holding our little Granddaughter. I’d have to say this is one of my favorite things I’ve ever created, only because it has special meaning for me.


Tell us more....

I usually start my day very early in my home studio, with a cup of coffee in hand and my dog, Zoey, perched  beside me on her chair....life is good!


Tuesday, October 23, 2012

Folk Wisdom Halloween: TWISTED Pumpkin Recipes!


I
f you're like us, you've been running around this whole time...and then you look up at your calender and realize--

HOLY SMOKES!  It's almost Halloween!

So, we've dedicated this whole week to All Hallow's Eve mayhem...starting with Pumpkin madness ~ with a TWIST! 

Move over, simple pumpkin pie! Here are some non-traditional ways to get your pumpkin fix!


Black Bottomed Mini Caramel Pumpkin Cheesecake Bites (that's a mouthful to say, and probably a mouthful to eat!) by Picky Palate


Super Tasty Pumpkin Pie Pancakes from Closet Cooking


                                         Pumpkin Scones by King Author Flour


                                            Pumpkin Pie-sicles by Family Fun


                                                         Pumpkin Fudge by Sweet Pea's Kitchen


Now don't just stand there, drooling! Get yourself into the kitchen !

Monday, October 22, 2012

A Word About Advertising....

Alrighty Folks,

            Occasionally, we'll interrupt our regularly scheduled informational, entertaining, and magical Folk Wisdom posts to tell you a little bit about our upcoming magazine.

    Hopefully, this will catch you up on the excitement we're feeling here, and we hope you feel excited, too.

Our latest topic is one we've been grappling with a bit lately, the issue of advertising.

Those shiny ads in some magazines are the best way a magazine has to pay for it's publication fees, but we also wanted to set up a system where we helped small, handmade, local, or fair businesses find advertising space they normally couldn't, in larger publications...

Basically,  what we've set up is a way to help you...help us...help you. Got that?

From the get-go, we wanted to showcase  businesses that create beautiful, self-sufficient, or practical things that jive with our Folk Wisdom ethics.

We realize that most huge publications may charge in such a way that these businesses couldn't afford advertisement space.

But we want to be a little different--
We have super-low introductory rates to get your message heard...AND, in the process, your ad helps US keep going and offer low prices to our readership, in the process!

**Plus, you'll get exposure to the type of  ready-made audience who can appreciate authentic products and services!

So, if you're interested in an affordable and effective way to get your business known, please
SEE OUR ADVERTISING PAGE.

AND THANK YOU IN ADVANCE!

Friday, October 19, 2012

Folk Wisdom: Photo Shoots and Folk Art Fridays!

                                                             Outtake! Photo by Jennifer MacNeill-Traylor

P
eople, it has been mayhem around here. Mayhem, I tell you!

We've been busy--hard at work, but having fun--crafting a magazine that we think you'll want to read.

Folk Wisdom is one part old ways living, one part tutorial, one part discovering old objects and people who use them, one part history, and one part magic.

What we intend is that you learn as much as possible how to create useful, healthful, wonderful things in your own life, and how beautiful and simple these things are.

More than a stuffy magazine, or just one with beautiful pictures, Folk Wisdom is DIY Old-Ways living, a fresh take one older skills.

With that in mind, there are TONS of photos going on. Right now, we're working several issues at once!

A few weeks ago, I was humbled to follow Master Herbalist Sarah Preston, from Pennsylvania, as we gathered goldenrod and nettle, to dye with--yes! These plants can, and have, been used to dye clothing for centuries.

Here's our favorite photo from that session--with plenty more to come--so stay tuned as our upcoming Fall issue will feature pics and info on how to make your own plant dyes.


Meanwhile--you may have heard last weekend I was in heaven, photoshooting with horses, in amazing pasture-land, and with an even more amazing photographer!

Jennifer MacNeil-Traylor has had the distinction of being an accomplished folk artist, with an emphasis on horse and animal painting, as showcased at her Gypsy Mare Studios. She is also a featured artist with The Trail Of Painted Ponies.

Long before I knew Jen in person, I was enamored of her paintings of folk life, farm life, and more. By the time I had met her, she had taken up the camera--and created her own dazzling effects with them.  Because of her experience with horses, it only made sense to have her on our cover shoot.

I couldn't be more right! Besides taking stellar photos, she helped wrangle our senior Percheron, Bob, in a pinch!  I am indebted to her professional work and creativity!

Below are sneak peeks of our cover shoot--as well as the outtake, above!  Do yourself a favor and get to Jen's blog site, where you'll find her Flickr photos, or hire her for whatever photos you have! I believe her ETSY Store also has some amazing prints and art by this master artist (don't tell her I called her "master artist," though--she may just blush!)


And stay tuned for NEXT Friday, as we continue to profile artists of ALL Sorts for our Folk Art Fridays!

Thursday, October 18, 2012

Folk Wisdom Find: Pa's Fiddle


Speaking of Little House on The Prairie...

You may remember, from those books (and the T.V. series), that Charles Ingalls (Laura's Pa) would break out the old fiddle and play a song at night, or at social events.

While this was often gleaned by as a small part of Ingall's talent, it's been recently noted that Pa Ingalls was a musician in his own right, creating, or recreating various violin tunes.

Recently, that talent has been rediscovered by a collective of folk and country musicians--including the likes of Randy Travis--and they've come together to reconstruct those forgotten works by Ingalls, and his contemporaries.

The result? Pa's Fiddle, An American band, was born. Beyond exploring the nearly 127 works of Ingalls's, The Pa's Fiddle Project celebrates mountain music and bluegrass, and it's made for a fine new musical legacy.

You can listen, and buy this compilation of their work HERE

You can see more HERE:


Wednesday, October 17, 2012

Simplyfying the Rocket Science of Homemade Pumpkin Pie


She was an imp, my grandmother Josephine. Silver hair piled high on her head, an apron glued to her waist at all times, she was not even 5 foot tall, even with her wispy bun. But still, she  maintained total control of her kitchen. No one was allowed in when she was cooking unless they were invited.

She invited me when I was 6.

It was Thanksgiving day on that chilly Chicago morning and pies needed to be made. She still used a wood stove, back then in the early 1960's, and her pumpkin did not slid out of a can, it was dug out of the actual orange squash. I liked shoving my hand into the mushy innards, pulling the seeds out through wet slimy innards and setting them aside to be roasted later.

It was then she pulled out the biggest kitchen knife I'd ever seen and chopped up the pumpkin into big hunks. She poured salt in my hands and instructed me to rub it over the vegetable chunks before she arranged them in a metal roaster pan splashed with a little water and then sliding it all into the stoves fired-up belly.

Not so long ago I taught my own grandchildren the same process; how to make pumpkin pie from real pumpkins. It's not rocket science but it does take a little time. Like my own grandmother we cleaned out the pumpkin and chopped up the veggie flesh.


But I cheated and used a natural gas oven. To start,  bake the pumpkin for 30 minutes at 350 and a little more time to allow the skin to cool, making it easy to remove the hard covering from the orange pieces.  Now turn the oven up to 400 degrees. You'll need it for the pie soon.

The rest of the recipe goes like this
     2 cups mashed cooked fresh pumpkin
     8 oz thick cream (I prefer raw milk with it's own natural cream)
     1/2 cup brown sugar
     1/4 cup raw honey (locally grown is best)
     2 large free range eggs lightly beaten
     1 teaspoon cinnamon
     1/2 teaspoon ground ginger
     1/2 ground nutmeg
    
Mix all together well and set aside.  Now gather your supplies for the crust and set all your crust anxieties aside as well. All you need to remember to make good pie crust is one word: COLD. The colder your ingredients and equipment the flakier and tastier your crust will be.

You will need
     pinch or two of salt
     1 stickhard  butter or 1/2 cup pure lard well chilled. (As the fat melts in the oven it will push the layers  of dough apart, giving you the flaky crust all cooks desire)
     2 & 2/3 cups flour also well chilled
     1/4 cup ICE water or very cold Vodka (the alchohol evaporates in the oven)

Place the flour in a cold bowl, add salt. Add the butter or lard in small amounts cutting them into the flour with a metal pastry cutter until the fat takes on the shape of small peas. Then slowly drizzle 1/2 of the water or vodka into the flour mixture. Mix.  But do not over mix. Add just enough additional liquid until the flour begins to leave the sides of the bowl and cling to your spoon or mixer paddle. Do not over mix. Yes, I know I said that already, but it's important.


Sprinkle some flour on your counter and begin rolling out the dough with a wooden rolling pin. Preferably one left to you by your own mother/grandmother/mailman. Rub a small amount of flour on it to keep the dough from sticking. When the dough circle looks big enough and round enough to cover the bottom of your pie pan, fold it in half.

Carefully lift it over your pre-greased pie pan and unfold it so the pie pan is covered. Use a sharp knife  to cut off the extra dough hanging over the pan and then pinch up the dough edges with your fingers. Make any pattern you want, this is YOUR pie!


Give your pie filling a good final stir and pour it into your pie crust to about 1/4 inch from the top. Slide it in the oven at 400 degrees for 15 minutes then turn the oven down to 350 and bake another 30 minutes or until the edges are brown and the filling feels spongy under your finger. You can cover your pie crust edges with a fancy crust cover if you want but a little edge burning just adds to your pies final beauty.

Let cool (or not) and EAT!

Guest Post -Maple Candy: Little House on The Prairie Style


Maple Candy ~ Little House on the Prairie Style
By Beth Wegner

I'll tell you the truth: I read The Little House On The Prairie books as a kid, and besides being initially fascinated with the "old-timer" things that were done, I didn't pursue the idea that you could use the information in those books for anything in today's world.

But one day, after reading Little Cabin the Big Woods to my own daughters, my younger girl, Hannah, asked me about making the maple candy.

There's a scene where Laura and her young cousins take the maple that her father, uncles and neighbors have harvested, and pour them over pans of snow to make hard maple candy that gets frozen. I was as fascinated as the next person by it, but didn't think we'd try it.

But when the girls asked, I thought "why not?"

What we found was that it actually worked!

So here's a version we have. There is also a Little House Cookbook out there somewhere, which re-creates the recipes found in Little House....which is a great resource, also!

Maple Candy:


            INGREDIENTS
  • 2 cups pure maple syrup
  • 1 tsp vanilla extract

    EQUIPMENT
  • saucepan (non-stick works best)
  • candy thermometer
Instructions:
  1. Cook syrup over very low heat until it begins to boil, stirring frequently.
  2. Continue boil until it reaches 233°F on the candy thermometer.
  3. Remove from heat and cool for aproximately an hour, or until the temperature on the candy thermometer reads about 110°F
  4. Add the vanilla extract and heat until smooth.
  5. Shape this mixture into small patties, or while still warm you can pour onto pans of clean snow as Laura did in Cabin in the Big Woods.
    If you don't have now, you can use crushed ice cubes and place into a pan before pouring the maple candy. You can also just pour the maple syrup into candy molds.
  6. Maple candy must be stored in airtight containers to prevent the candy from drying out.

    Enjoy!

Tuesday, October 16, 2012

Folk Wisdom Find: How to Make Your Own Basket

Darn the Brits, if they don't have a grand sense of the Historic, even today!

Luckily for us, we have the European gifts of those who keep up the old ways, and then show us how.

Such is the case of  Jon Rigeon, woodmaster and nature-crafter extraordinaire who seems to work wood and other natural materials into beautiful and functioning works. His website is full of various projects and tutorials that are interesting and useful, and he even has a few e-books and online classes that would be of benefit.

Check out his step-by-step willow basket tutorial. Yes, he's using European measurements, but they can easily be converted over! With historically accurate techniques, it's a bit involved, but for the serious crafter, or curious enthusiast, it's a must!

If you've got a willow tree at hand (or some supplies), you can make yourself a beautiful basket!


http://www.bushcraft.ridgeonnet.com/basicbasket.htm

Monday, October 15, 2012

Mama Elizabeth's Diary: How To Make Old-Fashioned Horehound Candy


W
ith winter coming up, I felt it time to break into the annals of some serious herbal care, since taking care of oneself naturally has always trumped anything artificial. For this, it was time to work the same advice that Mama gave me. See, Mama--also known as Aunt Elizabeth to some--was the same farm-woman whose WWII era advice and knowledge got to me. Her folk wisdom is no different in this case.
Fall and Winter signal scratchy throat and cough season. Mama's secret weapon? Horehound candy. If you've never heard of it, be prepared for some serious folk-wise knowledge...
 

H
orehound candy is an old-fashioned "candy" with herbal benefits to the throat, as Common or White Horehound (Marrubium vulgare) is considered an expectorant and tonic..it helps ease cough and respiratory issues and soothes the throat.


The candy, itself, is usually found in stores and homes in Europe, with an acquired taste there. I will say, from having made this candy with my mama, that too much horehound, and horehound, undiluted with sugar or lemon (or anything else) is QUITE sour or bitter.
 This candy is prepared from extract obtained from the leaves, flowers and stems of horehound plant. The horehound plant belongs to the mint family and it has medicinal uses that date back to the  Roman and Ancient Egyptian era. In America, it was noted that colonial era Americans used to "growe the bitter weede" in their garden in order to make "candies from boiled sugar."

How to Make Traditional Horehound Candy

Ingredients
*1/4 Cup dried horehound leaves, flowers and stems
* 3 quarts water
* 3 cups brown sugar
* 1 teaspoon lemon juice
* 1 teaspoon butter
* 1 teaspoon Cream of Tartar (you may omit this but the candy will not be "mellow"/will be slightly bitter)
* Powdered sugar

Utensils:
*Medium or Large saucepan
*Cookie sheet or large flat baking dish
*Candy Thermometer
*Wax paper
*Sharp knife

Directions
1.Pour water into a pot, and and bring it to a boil.

2.Remove the pot from heat and add the horehound to it. Leave horehound to steep in the hot water for about 30 mins.

3.When the water is slightly warm or cool, strain the leaves, flowers, and stems.

4.Take 2 ½ cup of the liquid and pour it into a saucepan.

5.Add cream of tartar, brown sugar, lemon juice to it and bring the liquid to boil.

6. Use your cooking thermometer and boil until liquid reaches 240 degrees Fahrenheit--then add butter and continue boiling the liquid until the temperature reaches 312 degrees Fahrenheit.
NOTE: DO NOT STIR LIQUID at its boiling stage
7. Once the temp of 312 degrees is reached, remove from heat and pour the liquid into shallow buttered pan or a buttered cookie sheet and leave it as it starts to harden.

8. Before it gets completely hard, use a buttered sharp knife to cut into bite sized squares.

9.Sprinkle liberally with powdered sugar... OR pull the pieces like taffy, and roll these into a ball and then roll into powdered sugar.

10. Wrap these in wax paper to store them.


Friday, October 12, 2012

The Latest Folk Wisdom News!

                         Here's what we've hatched up!
A
lrighty, Folks!

Here's what's afoot!

For those of you who have kindly asked about our PRINT magazine, here is the distribution schedule!

SPRING 2013 - delivery date: 1st week of Feb 2013
SUMMER 2013 - delivery date: Mid May 2013
FALL 2013 -delivery date:  Late August 2013
WINTER 2013 - delivery date: Early October 2013

We will have our purchase button up early next week, for those asking for Early Bird Specials!
 ~~~~~~~~~~~~~~~~~~~
In other News:

NEW FEATURE: FOLK ART FRIDAYS--

                                                                                     Zan Asha's Folk Art

 Are you a professional folk artist? Do you create old-style works or depict old themes? We'd love to feature you!

Just send us an inquiry at folkwisdommagazine(at)gmail.com

From there, we will ask you for a bio and a few jpg pictures of your work, which will we will feature each Friday!

Would you like to recommend an artist! Feel free to email us, as well!

~~~~~~~~~~~~~~~~~~~~~~~~~~~~~~~~~~

CURRENTLY LOOKING FOR WRITERS FOR OUR MAGAZINE!

Please be an expert in the following:

Old Style Stone Masonry
Kiln Pottery
Lace Making
Tatting

Feel free to look at our WRITER's GUIDELINES and drop us an email if you are interested in contributing!

REMEMBER, all emails can be sent to folkwisdommagazine(at)gmail.com

Thanks!
Zan Asha

Thursday, October 11, 2012

Folk Wisdom Tidbit: The Apple Pie ABC

And Speaking of Apple Pie...


The Apple Pie ABC is a simple rhyme meant to teach children the  the alphabet and relates the various ways children react to an apple pie. After the first line, A was an apple pie, the rest of the letters refer to verbs.


The earliest mention of the rhyme appears in a religious work dated 1671.  It first appears in printed form in Child’s New Play-Thing: being a spelling-book intended to make the learning to read a diversion instead of a task (London 1742, Boston 1750).


For more historical tidbits like this, old customs, superstitions, old-ways skills and whatnot--on a daily basis...visit our FACEBOOK PAGE.

*****And stay tuned--tomorrow we will have a few interesting announcements! ****

Wednesday, October 10, 2012

Folk Wisdom Food: Apple Pie Recipes

Alrighty Folks!

        So there's a nip in the air and the colored leaves billowing out of every outdoor (and sometimes indoor!) nook and cranny has you in the mood for some serious Fall Food!

We agree and what could be more Fall-ish, if not Americana, than Apple Pie? 

Here's Zan Asha's simple-yet-homemade pie (probably made simpler if you get ready-made crust, your choice):


SIMPLE CRUMBLY APPLE PIE

NO - ROLL PASTRY:
1 1/2 c. flour
2 tbsp. milk
1 tsp. salt
1 tbsp. sugar
1/2 c. vegetable oil
PIE FILLING:
6 or 7 apples
2/3 c. sugar
1 tsp. cinnamon
2 tbsp. butter
TOPPING:
1/2 c. butter
1/2 c. sugar or brown sugar
1 c. flour
Pastry:
Mix flour, salt, and sugar together.
Mix oil and milk together and pour into the above flour mixture.
Mix the whole thing well with afork.
Press into pie pan with fingers, and line the bottom and sides of pan with mixture.
Filling:
Mix sugar, cinnamon, and butter together.
Pour over apples and mix well.
Pour into crust.

Topping:
Mix butter, sugar, and flour together, and sprinkle on apples.

Bake pie at 400 degrees for 50 to 60 minutes.
Enjoy!


PLUS we've compiled some tasty (and some different!) ways to make Apple Pie (see below)..
AND scroll to the bottom for a link for a great way to make lattice crust!


                                      Tasty ButterScotch Apple Dumplings BY ALLRECIPES


                                   (Very Detailed!) Apple Pie Tart from Smitten Kitchen


                                 PLUS! HOW TO MAKE A LATTICE TOP By  Annie's Eats


Join us on our FACEBOOK PAGE for more Folk Wisdom on apples!